
What You Need to Know about Zoom's New Features

Zoom has quickly become an important tool in our new work-from-home lives. Unfortunately, there have been bumps along the way, including security and privacy controls. As the video conferencing application became widely used, one of the biggest issues users have experienced is having unwanted guests join meetings for the purposes of sharing inappropriate content.
Zoom just implemented increased security features and most are enabled by default. It is unfortunate we have to worry about things like this, but since we do, this blog covers what you need to know about Zoom's new features, as well as some settings that already existing.
What You Need to Know about Zoom's New Features
For the purposes of this post, the terms meeting and webinar are used synonymously. While they are different and used for different types of video communications, the security settings discussed are applied the same way.
Before the recent updates, Zoom had some helpful settings for managing meetings, but unfortunately they were typically disabled by default. As a result, anyone who neglected to browse the settings in the web interface before hosting their first meeting never saw what was available. This has led to many unintended consequences.
Below are three settings that already existed, in addition to three new settings you should consider before hosting your first meeting. It is important to clarify that the settings discussed in this post are accessed by logging into the web interface and clicking on the Settings menu. There is a Settings menu in the local application, but it does not provide access to the controls listed below.
Controls that already existed
NOTE: Some features discussed require a minimum version of the Zoom application. Those are designated by the small box with a V. in it displayed at the end of the setting description. Hovering over the V will display the version that supports that feature.
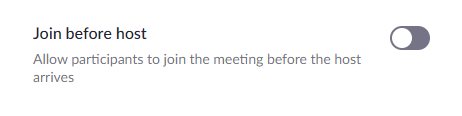
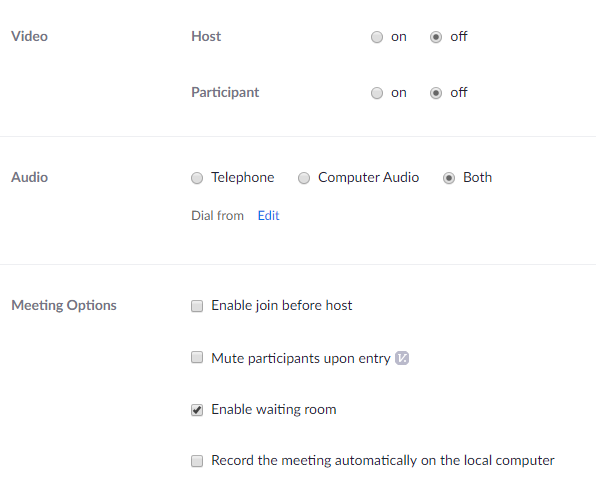
1. Join before host - This should be disabled for most everyone. When it is enabled, people can join the meeting/webinar before the host. This means it is possible for inappropriate things to happen before the hosts. Only a host can remove an attendee so it is always a good idea to disable this feature.
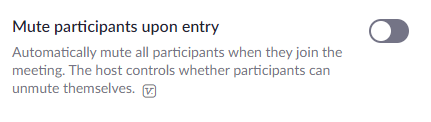
2. Mute participants upon entry - Depending upon the type of webinar you are hosting, you may want to enable the "Mute participants upon entry" setting. When enabled, attendees are automatically muted when they join the webinar. If you enable this feature, you will be prompted to choose between allowing participants to unmute themselves, or to manage this as the host.
If you choose not to allow participants to unmute themselves, then only hosts can unmute them. Keep in mind you can have multiple hosts.
3. Screen sharing - This setting allows you to manage who, if anyone, can share their screen with all participants of a meeting. As a host, screen sharing can be extremely helpful depending upon what information you are sharing. Anyone presenting to a group, rather than meetings that are more like group discussions, will likely find screen sharing helpful.
However, allowing others to share their screens also presents security risks. When determining what you are allowing, consider if you are sharing your meeting ID and password, or meeting link widely and socially in a way where you do not know everyone who attends. If the answer is yes, you should limit screen sharing to only the host, or nobody if it is not needed at all.
If you are meeting with a group who meets regularly, who keep the meeting info private, or where there are very few guests, allowing all participants to share can be fine. However, if there is no need for others to share their screen and present information, use caution and keep this set for the host only.

NOTE: As far as the "Who can start sharing when someone else is sharing?" setting, I would never recommend allowing this for all participants.
New controls implemented on April 5th
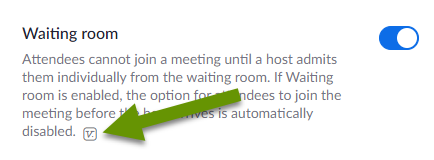
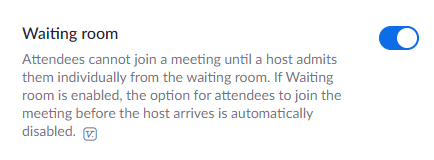
1. The waiting room! - One of the best new security features included in the April 5th update is the ability to place webinar attendees in a virtual "waiting room" upon joining. Once someone is in the waiting room, the host has the ability to allow or deny entry to the webinar. When enabled, guests join the webinar normally, but they only enter the webinar after the host approves them.
While the waiting room adds an additional step for the host, which could be tedious for larger webinars, it is a great way to control who enters. If you are publicly sharing a meeting invite and trying to get additional participants, you should definitely enable the waiting room feature. If necessary, create additional hosts who can be dedicated to approving attendees to prevent delays and lost interest.
2. Password combos with meeting IDs - This setting requires users to have passwords that go along with the meeting ID to prevent uninvited attendees. There are several settings related to passwords, but the basic principle is that attendees who use a meeting ID when joining a meeting will also be prompted for a password. Without both, they will not be able to join.
Passwords can be used:
- When scheduling new meetings
- For instant meetings
- For meetings using Personal Meeting ID (PMI)
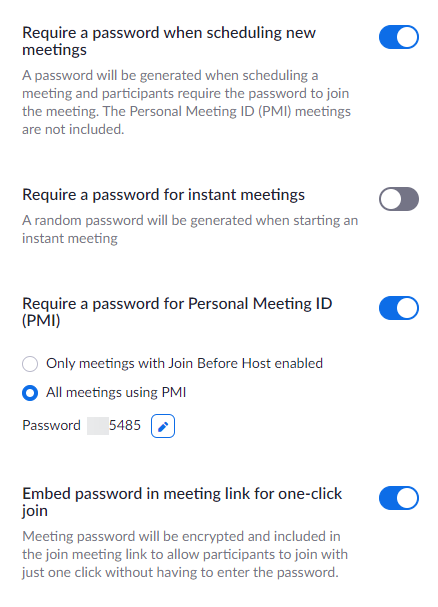
NOTE: The password can be embedded in the meeting link. This is helpful when sending the email invitation only to specific people, who will not share the link with anyone who should not have it.
3. Security menu - When hosting a meeting there is now a security tab present on the pop-up menu inside the meeting. This pop-up provides the ability to enable/disable waiting rooms, chat, screen sharing and more. If the needs of the meeting change, or you start to have issues, try using the Security menu to modify settings which is much easier than starting a new webinar and getting everyone connected again.
In summary
It is important to note that many of these security and privacy settings cannot be changed once a meeting starts. This means you really need to consider what configuration settings are best for you. It is possible that different settings will be needed for different meetings. Some settings can be modified within the create a meeting setting, but in general, you will want to configure the settings in such a way that they work best for all hosted meetings.
Settings that can be modified in a specific meeting are displayed in the image below:
New security settings properly combined with existing settings help meeting hosts prevent unwanted attendees from joining. Stopping unwanted participants from sharing their screens is great, but preventing them from ever joining by enabling the waiting room is even better! Luckily, whatever type of webinar you are hosting, there should be a combination of settings to meet your unique needs. Lastly, I am sure this will not be the last security rollout so stay tuned for additional features.
As always, taking the time to look at what settings are available is the best way to find the right configuration for your unique needs!