
How to Start Presenting with Zoom in 4 Steps

Webinars, also known as online presentations, video communications, web conferencing, or web seminars are growing increasingly common. Many industries and individuals use these as a way to present their products or services to a greater number of people. The rise in popularity of webinars has occurred for several reasons, including because they:
- Are an easy way for groups of people to gather together at the same time.
- Provide a way for people in different geographic locations to easily connect at no additional expense.
- Are a more viable option for the average person as faster internet speeds are becoming increasingly more common.
Additionally, there are several companies that provide video conferencing software that allow users to create accounts and host presentations for free. The ability to host a presentation for free, without needing complex or expensive software or hardware, also increases the popularity of webinars. Video conferencing is often used to host presentations, have group meetings, host a Q&A panel, as well as many other uses.
This post covers the 4 steps you need to know if you are interested in sharing information with others but are unsure of how to get started hosting a webinar.
How to Start Presenting with Zoom in 4 Steps
Zoom is a very popular software company that provides a platform for people to host webinars for free. Obviously there are some restrictions, like the amount of participants for any single webinar and the length of each webinar, but when you are getting started, a free plan is sufficient and the best way to start. This post covers the 4 main steps you will need to begin hosting your own webinars.
Step 1 - Create an account
The first step is to visit Zoom's website and create a free account. From their website, simply click the "Sign up, it's free" button in the upper right corner. Creating a free account only takes a few minutes and does not require a credit card.
Step 2 - Start a presentation
Once you create an account and log into it, you can host a presentation. It is important to practice this step before hosting a live event. Have someone you trust join your webinar so they can provide feedback. This also gives you time to make sure you understand how the controls work. Lastly, this is the time to verify your audio and video are correctly delivered to participants.
To start a presentation, hover over the "Host a Meeting" button and select the appropriate type of meeting:
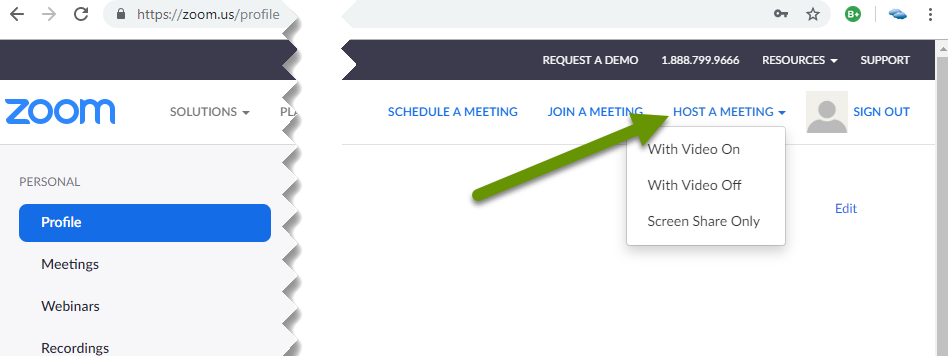
- With video on - includes a window of the presenter in real time.
- With video off - includes a window showing the presenter's name without video of the presenter.
- Screen share only - only shares the desktop or presentation chosen to be shared with attendees.
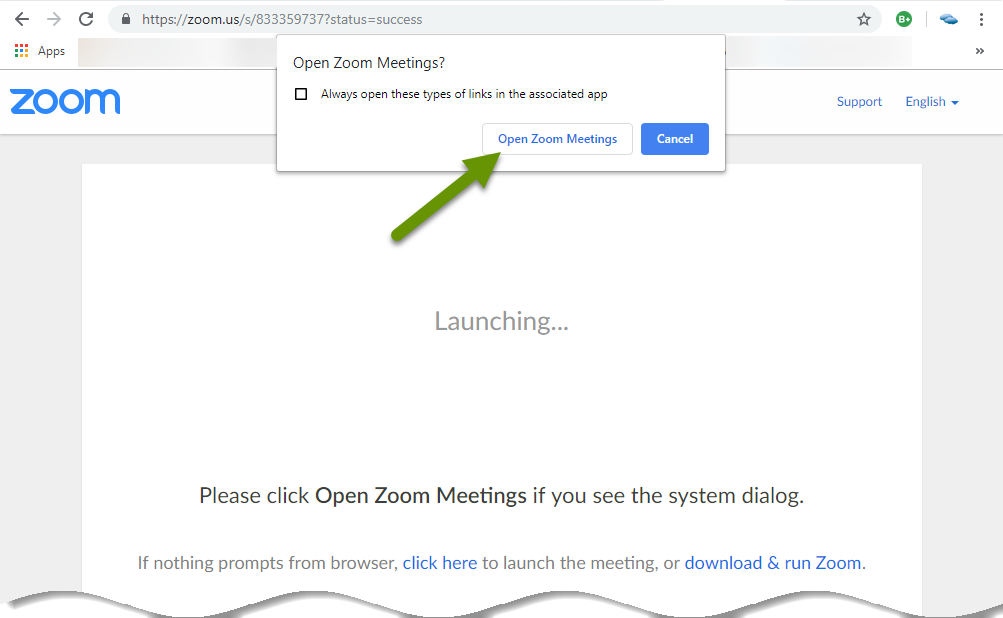
When prompted, click the button to "Open Zoom Meetings". If you prefer, click the button next to "Always open these types of links in the associated app".
If this is your first presentation, you should click to test the speaker and microphone before any participants join.
- Click the "Test speaker and microphone" link.
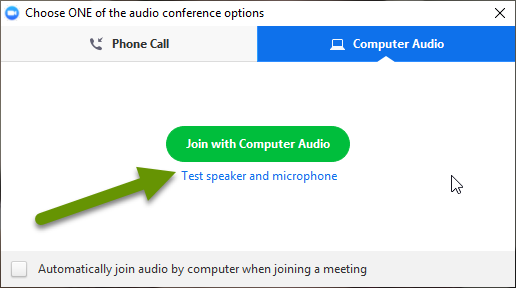
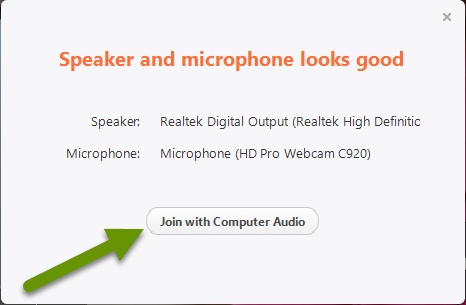
- This will bring up a dialog box that will play a tone and ask you to verify if you can hear it.
- Next it will ask you to speak and verify you can hear yourself when the audio is played back.
- Once these are both successful, click to join the presentation with computer audio.
If you prefer, you can select to join with computer audio in the first prompt in future presentations. However, it is always a good idea to run through these tests to be sure your system is operating as you expect. Checking the audio takes less than a minute. NOTE: If you do not have a microphone on your device, you will want to click the "Phone call" tab when prompted with audio options. Most laptops have microphones and external webcams typically include microphones as well.
Step 3 - Understand the controls
Once the presentation launches, hosts have access to a control panel with the following options:

- Mute - allows you to mute your microphone or select the appropriate microphone if you click the arrow for more options.
- Stop video - stops the video but audio continues to be shared with participants.
- Invite - provides a link to invite people to your webinar and the ability to email people a link.
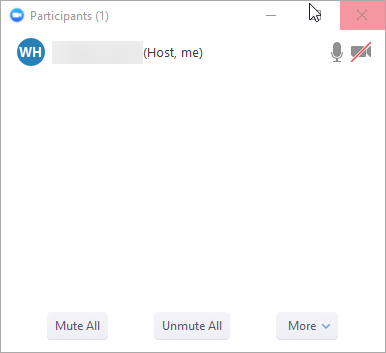
- Manage participants - brings up a participants window that allows you to mute and unmute all participants as well as the following under the More menu:
- Mute participants on entry
- Allow participants to unmute themselves
- Play an enter/exit chime
- Lock the meeting
- Share - launches a window to select what window or application to share - see detailed info on these choices in Step 4.
- Chat - brings up the chat window so you can see who is posting comments. This also allows you to chat and reply to everyone at once or directly to an individual.
- Record - records the presentation.
- End meeting - ends the meeting. Keep in mind you can stop video and pause a meeting so there are more choices than simply ending a meeting.
Step 4 - Switching between screen sharing options
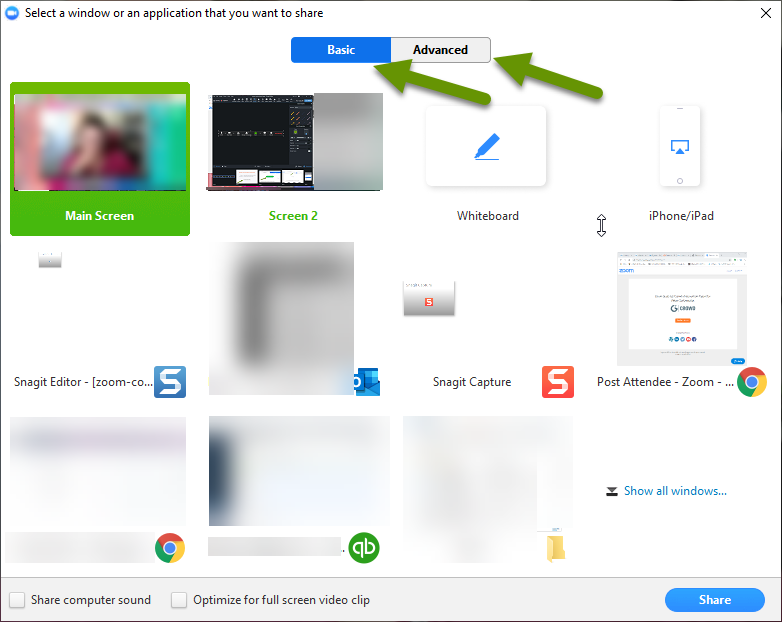
Typically a webinar starts with one or more hosts visible then switches to a presentation or a screen share. To switch between different types of media to share, use the Share button in the control panel. Click the "Share" button in the control panel to access all the different things you can share.
When sharing, there are two tabs to choose from: Basic and Advanced. The Basic tab lists the available monitor(s) as well as shortcuts to open and most recently used programs or applications. NOTE: When you choose to share a monitor (screen), it shares the entire screen so be sure to maximize your presentation. If you do not want to share an entire monitor, use the portion of screen option available in the Advanced tab.
The Advanced tab allows you to select the webcam or a portion of your screen.
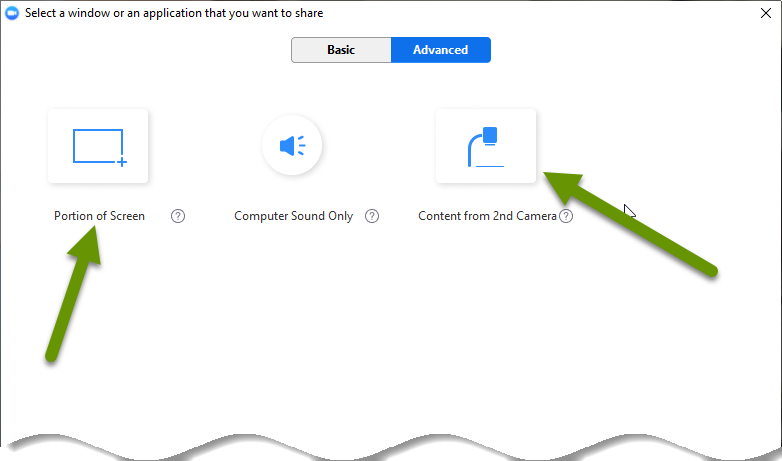
The Portion of Screen option allows you to select a certain area of your desktop to share. If you are working on a single screen, using this option allows better control over what participants see. When you have multiple monitors it is easier to move applications to a screen only you see and maximize what it being shared with participants.
The camera option is how you switch back to the webcam if you were showing a presentation or a portion of your screen. This is helpful when sharing a story, expressing something where you want participants to see you talking or even to hold up an item or product for people to see. Remember, it is always smart to test settings BEFORE beginning your presentation.
Online presentations or webinars are being used by more industries than ever before. Zoom is a great free tool that allows you to host a meeting, present a slideshow or application overview, get feedback, answer questions, or have a round table discussion. Even if you are simply a participant, it is helpful to understand what the controls do and how to maximize the features available.
As always, new technologies are always coming and having a firm grasp on how to best utilize them saves time and can help you keep your business in front of others!