
How to Record Photoshop Actions so they can be Automated

If you ever work with Photoshop, you know it can be an amazing tool. It can also be overwhelming at times because there are so many features. Whether you use it on a daily basis or a few times a year, there are some features you may not know about that can save you copious amounts of time once you learn how to use and apply them, which can be done fairly quickly.
This post discusses how to record actions in Photoshop so they can be automated against multiple files at once.
For those who prefer visual learning, check out our video demonstrating this process.
How to Record Photoshop Actions so they can be Automated
There are many reasons why recording actions in Photoshop is helpful. One of the best aspects of recording actions is that it can be applied to multiple files at once using a batch automation. This means hundreds of files can be modified while requiring only a minute of your time. Even if you only work with a few files at a time, it is worth recording repetitive actions as the action can be applied with the click of a button.
Here are just a few examples of the types of actions that can be recorded and turned into automations:
- Resizing images
- Adding a background to logos or other images
- Changing the color of a background, text object, or other item
- Adding a watermark to images which is helpful when uploading unique works to websites or other shared locations
- Changing the image rotation
- Saving files as a different type of file (jpg to png, etc.)
- And much more!
Recording actions to automate
First, it is helpful to plan what actions you want to record. Practicing will help prevent adding unnecessary steps while recording actions. Keep in mind, you can have multiple actions in a single recording, but actions are often more versatile when recorded as singular actions. You can always apply more than one action to a set of files, but you cannot single out a particular task in a recorded action when multiples exist.
Once you are ready with your plan, follow these steps to record an action:
- Open Photoshop and open a file that you can use to create the action you want to record.
- Click on the "Window" menu and select "Actions" if this is not already checked.
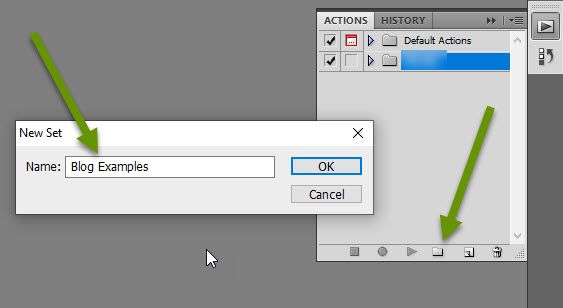
- Click on the folder icon at the bottom of the Actions menu to create a new folder set. This makes it easier to find the recorded actions you create.
- Type in a name for the folder set when prompted then click "OK".
Once the folder set is created, it is time to record the action.
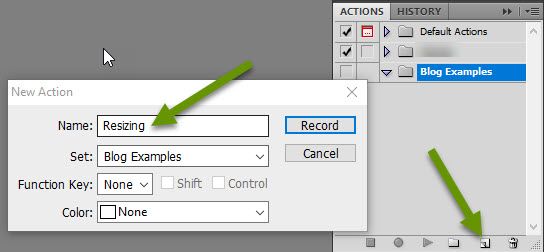
- Click the icon between the folder and garbage icons to create a new action.
- Give the action a name and verify it will be listed in the folder set you just created by checking name next to "Set:".
- Click the "Record" button to begin the recording.
Once the recording begins, do the steps to create the action. In the example below, we show how to record a simple resizing of an image.
- With the recording started, press Control + Alt + I to open the Image Size box.

- Change the width, height or both as desired then click "OK".
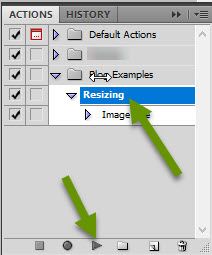
- Click the stop button in the bottom of the Actions menu to stop the recording once the resizing tasks have been recorded.
- The new resizing action is now listed in the Actions menu.
Continue to create singular or multiple task actions as desired. Once an action has been recorded, it can be applied to single files or automated against a batch of files.
Applying actions to single files
To apply a recorded action to a single file, open a file in Photoshop and follow these two steps:
- Click to highlight the action to apply.
- Click the play button in the bottom of the Action menu.
Automating actions against multiple files in a batch
To apply a recorded action against multiple files at once, create a batch automation by following the steps below:
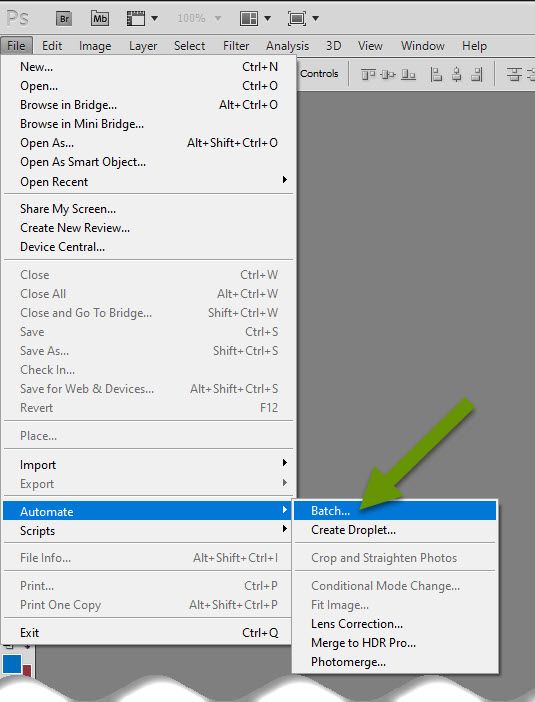
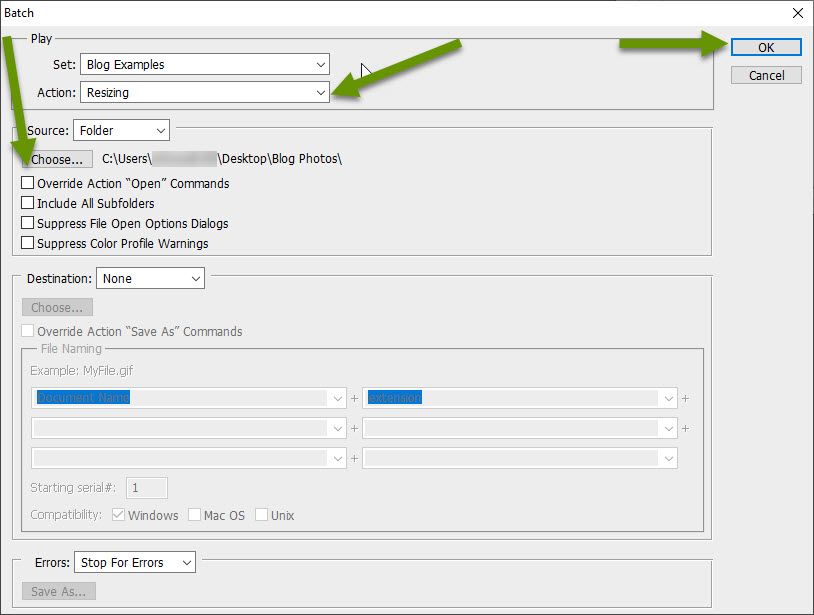
- Click the File menu and select "Automate" to expand the menu and select "Batch".
- In the batch pop-up, verify the selected set is the folder set you created.
- Choose the action to apply from the available recorded actions using the drop-down next to "Action:".
- Click the "Choose..." button to select the folder holding the files that the action will be applied to.
- Check the box next to "Include All Subfolders" if desired.
- Click the "OK" button in the top right corner to begin the automation.
Once the automation has finished, all files in the folder will have had the action applied to it.
Photoshop is an amazing program when working with image files and there are a multitude of ways you can modify and enhance images. Unfortunately, each of these takes time. One way to save time is to record those actions you find yourself regularly doing to files. Once an action is recorded, it can be applied to a single file or applied to a batch of files using an automation. Applying recorded actions is an extremely efficient way to make changes to files.
As always, anytime you can automate steps you repeatedly take, you can save tons of time!